はじめに
久しぶりにゴルフの打ちっぱなしに行ったんですが、自分のスイングを撮影してみたらあまりにも不格好でした。
そこでふとスイングを分析できないかと思い、MMPoseというものを使用してみることにしました。
これにはpytorchとかnvccとかが必要になってきます。今までpytorchは動いていましたが、nvccはインストールしていなかったので、重い腰を上げて環境整備から始めました。
WSL2環境です。
環境整理
$ cat /etc/os-release
PRETTY_NAME="Ubuntu 22.04.5 LTS"
$ arch
x86_64
$ python --version
Python 3.12.8
$ python -c 'import torch;print(torch.__version__);print(torch.version.cuda)'
2.5.1+cu124
12.4
$ nvcc -V
Command 'nvcc' not found, but can be installed with:
sudo apt install nvidia-cuda-toolkit
$ gcc --version
gcc (Ubuntu 11.4.0-1ubuntu1~22.04) 11.4.0
Copyright (C) 2021 Free Software Foundation, Inc.
$ nvidia-smi
+-----------------------------------------------------------------------------------------+
| NVIDIA-SMI 560.35.02              Driver Version: 560.94         CUDA Version: 12.6     |
|-----------------------------------------+------------------------+----------------------+
はい、ここからスタートです。
CUDA準備
$ sudo apt install nvidia-cuda-toolkitだと11.6のCUDAがインストールされてしまったので、nvidia公式の方からとってくる。
wslの環境に合わせて以下リンクから。
https://developer.nvidia.com/cuda-12-4-0-download-archive?target_os=Linux&target_arch=x86_64&Distribution=WSL-Ubuntu&target_version=2.0&target_type=runfile_local
指示に従ってwgetでとってきて、toolkitオプション付けてインストール。
$ wget https://developer.download.nvidia.com/compute/cuda/12.4.0/local_installers/cuda_12.4.0_550.54.14_linux.run
$ sudo sh cuda_12.4.0_550.54.14_linux.run --toolkit
ここで選択肢とかいろいろ出てきたけど、初期状態のままインストールを選択。Runtimeとかも一緒にインストールしました。
$ sudo sh cuda_12.4.0_550.54.14_linux.run --toolkit
===========
= Summary =
===========

Driver:   Not Selected
Toolkit:  Installed in /usr/local/cuda-12.4/

Please make sure that
 -   PATH includes /usr/local/cuda-12.4/bin
 -   LD_LIBRARY_PATH includes /usr/local/cuda-12.4/lib64, or, add /usr/local/cuda-12.4/lib64 to /etc/ld.so.conf and run ldconfig as root

To uninstall the CUDA Toolkit, run cuda-uninstaller in /usr/local/cuda-12.4/bin
***WARNING: Incomplete installation! This installation did not install the CUDA Driver. A driver of version at least 550.00 is required for CUDA 12.4 functionality to work.
To install the driver using this installer, run the following command, replacing <CudaInstaller> with the name of this run file:
    sudo <CudaInstaller>.run --silent --driver

Logfile is /var/log/cuda-installer.log
nvcc確認。
$ /usr/local/cuda-12.4/bin/nvcc --version
nvcc: NVIDIA (R) Cuda compiler driver
Copyright (c) 2005-2024 NVIDIA Corporation
Built on Tue_Feb_27_16:19:38_PST_2024
Cuda compilation tools, release 12.4, V12.4.99
Build cuda_12.4.r12.4/compiler.33961263_0
やっとスタート地点ですね。パスは通しておきます。
MMPose 前提条件導入
基本https://mmpose.readthedocs.io/en/latest/installation.htmlにしたがってやります。
一部以下の記事を参考にしています。
https://zenn.dev/kun432/scraps/05b4c0e392cd9b
インストールの際、MIMというものが推奨されているようです。setuptoolsだけ更新してから以下のコマンドを実行。
$ pip install -U openmim
$ mim install mmengine
さて、ここからバージョン依存の部分がたくさん出てくるようですね。まずはmmcv。
$ mim install "mmcv>=2.0.1"
Looking in links: https://download.openmmlab.com/mmcv/dist/cu124/torch2.5.0/index.html
...
Successfully built mmcv
Installing collected packages: mmcv
Successfully installed mmcv-2.2.0
これは自動的にtorchのほうと合わせてくれている・・・ように見えて、本来2.5.1のtorchを使っているところ2.5.0のものを取ってきていますね。ビルドに数十分はかかりましたが一応問題なくインストールできていそうです。
一応動作確認も行いOK、CUDAバージョンもあっています。
$ python
>>> from mmcv.ops import get_compiling_cuda_version, get_compiler_version
>>> print('cuda version:', get_compiling_cuda_version())
cuda version: 12.4
>>> print('compiler information:', get_compiler_version())
compiler information: GCC 11.4
お次はmmdetというもの。これは一瞬でインストール自体はできますが、以下のエラーが出ます。依存性がおかしいのが原因で、importしたときも同様のエラーが出ます。
$ mim install "mmdet>=3.1.0"
...
Installing collected packages: terminaltables, shapely, pycocotools, mmdet
ERROR: pip's dependency resolver does not currently take into account all the packages that are installed. This behaviour is the source of the following dependency conflicts.
mmdet 3.3.0 requires mmcv<2.2.0,>=2.0.0rc4; extra == "mim", but you have mmcv 2.2.0 which is incompatible.
...

$ python
>>> import mmdet
Traceback (most recent call last):
  File "<stdin>", line 1, in <module>
  File "xxx/python3.12/site-packages/mmdet/__init__.py", line 16, in <module>
    assert (mmcv_version >= digit_version(mmcv_minimum_version)
            ^^^^^^^^^^^^^^^^^^^^^^^^^^^^^^^^^^^^^^^^^^^^^^^^^^^
AssertionError: MMCV==2.2.0 is used but incompatible. Please install mmcv>=2.0.0rc4, <2.2.0.
ここのバージョンチェックのところで落ちているようです。あまりやりたくはないですが、このTracebackで表示されているところに等号を追加して通るようにします。
assert (mmcv_version >= digit_version(mmcv_minimum_version)
        and mmcv_version <= digit_version(mmcv_maximum_version)), # 等号追加!
これでimportは通ります。今後不都合がないことを祈ります。
MMPose導入
やっとMMPoseを導入できます。今回はソースからビルドしてみます。
git clone https://github.com/open-mmlab/mmpose.git
cd mmpose
pip install -r requirements.txt
pip install -v -e .
requirements.txtの中身は特に変なものはなく、今の環境が壊れそうにもなかったのでそのまま実行。
問題なく完了し、importも出来ているようです。
$ python
>>> import mmpose
>>> mmpose.__version__
'1.3.2'
動作確認
こちらもチュートリアル通りですね。特に何も考えずにデモを実行。
mim download mmpose --config td-hm_hrnet-w48_8xb32-210e_coco-256x192 --dest .
python demo/image_demo.py \
tests/data/coco/000000000785.jpg \
td-hm_hrnet-w48_8xb32-210e_coco-256x192.py \
td-hm_hrnet-w48_8xb32-210e_coco-256x192-0e67c616_20220913.pth \
--out-file vis_results.jpg \
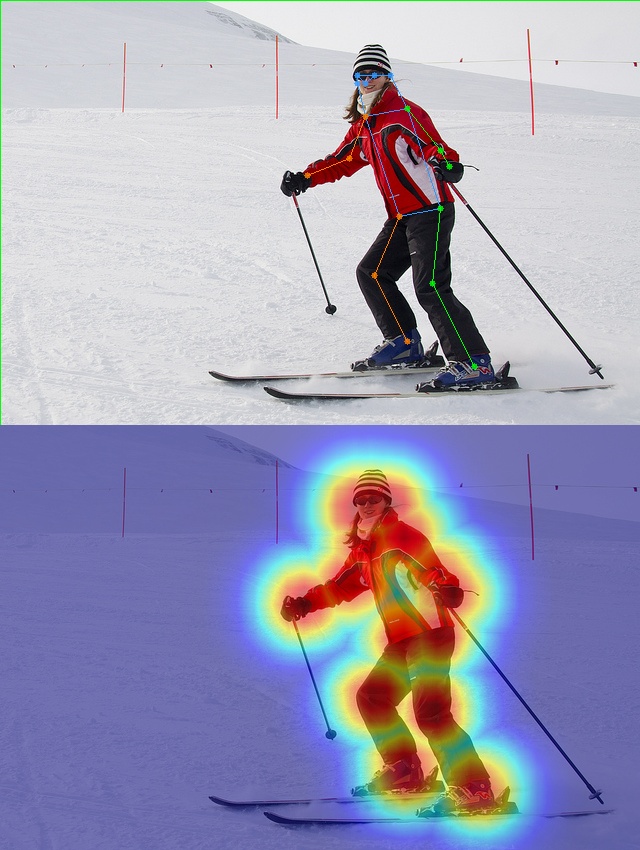
--draw-heatmapvis_result.pngというファイルが無事できました。二次元だとヒートマップが作成できます。
本題
やっと今回やりたいことに入れます。ここからが本番ですね。
何をやりたいかというと、動画の人物の姿勢を解析したいというのが今回の目標でした。
まずは使い方を学ぶ
推論の際にもいろいろなパターンがあるようです。2D、3D、顔、手、全身、動物、etc…
ドキュメントを読む限り、モデルごとに骨格がもともと定義されているようですね。目的に合わせて固定された骨格を使用すればよいのでしょう。
とりあえず以下のDemoが目的に合っていそうなのでやってみます。
https://mmpose.readthedocs.io/en/latest/demos.html#d-human-pose-demo
Inferencerという単語がよくわからなかったのでマニュアルを読みます。
https://mmpose.readthedocs.io/en/dev-1.x/user_guides/inference.html#inferencer-a-unified-inference-interface
Inferencer: a Unified Inference Interface
MMPose offers a comprehensive API for inference, known as MMPoseInferencer. This API enables users to perform inference on both images and videos using all the models supported by MMPose. Furthermore, the API provides automatic visualization of inference results and allows for the convenient saving of predictions.
要はモデルを使いやすいインターフェースを提供しているというだけのことですね。一般人にはこれで良いのかな?
デモをやってみます。
$ python demo/inferencer_demo.py tests/data/coco/000000000785.jpg \
    --pose3d human3d --vis-out-dir vis_results/human3d
...
  File "/home/wsl2/work/python/mmpose/mmpose/visualization/local_visualizer_3d.py", line 295, in _draw_3d_data_samples
    fig.canvas.tostring_rgb(), dtype=np.uint8)
    ^^^^^^^^^^^^^^^^^^^^^^^
AttributeError: 'FigureCanvasTkAgg' object has no attribute 'tostring_rgb'. Did you mean: 'tostring_argb'?
残念ながらエラー。matplotlibのバージョン違いのせいだったので、コードを以下のように修正して再試行したところうまくいきました。
# mmpose/visualization/local_visualizer_3d.py:Line327
        try:
            pred_img_data = np.frombuffer(fig.canvas.tostring_rgb(), dtype=np.uint8)
        except AttributeError:
            pred_img_data = np.frombuffer(fig.canvas.tostring_argb(), dtype=np.uint8)
            pred_img_data = pred_img_data.reshape(-1, 4)[:, 1:]  # ARGB → RGB のみ取得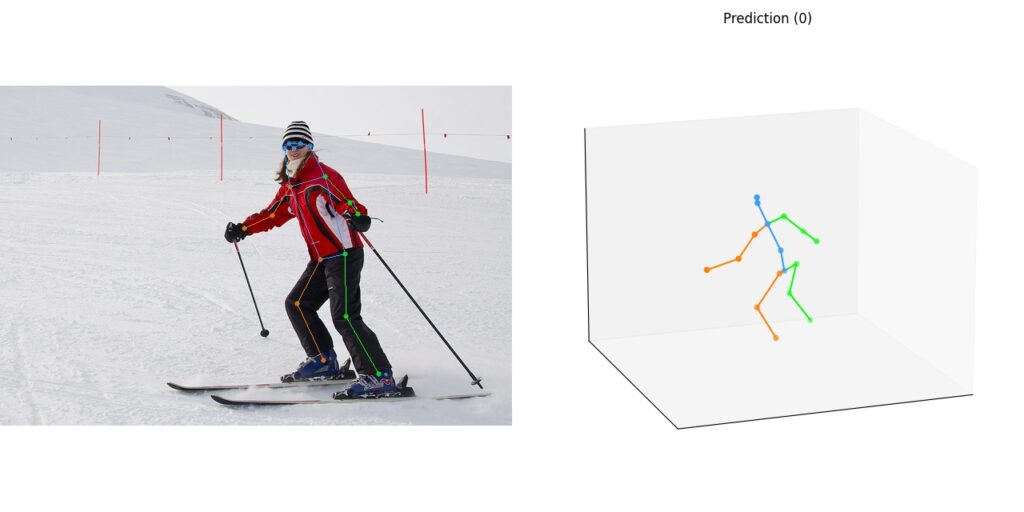
ちょっと正確かどうか微妙だけど動いていますね。
どうやらこの引数には画像も動画も渡せるようなので、思ったより簡単に使えそうです。
モデルについて、どれがいいのか少し見てみましたが、上のデモで
--pose3d human3dとすると、自動的にMotionBERT-finetunedというものが使われるようになっていました。メトリクスについて調べたところ、MPJPE(Mean Per Joint Position Error)とかが小さいほどいいらしいので、どうやら勝手に一番いいものを使ってくれていたようですね。
速度を求めるならVideoPose3Dというものを使った方がいいのかな?
いざ解析
自分が撮影した動画を切り取って分析にかけてみました。
https://mmpose.readthedocs.io/en/latest/demos.html#d-human-pose-two-stage-estimation-demo
のデモを利用して解析しています。思ったよりはいいですね。膝とか腰とか要所の位置は案外正確に見えていそうな気もしますが、どうしても体の陰になるところは荒らぶってしまいます。
あと、映像の方だとこんなに腕が曲がってはいないんですが、2Dの動きから3Dの動きに変換する際に実際の動きから乖離しているところはかなりありそうです。
出力はセーブされていて、各フレームでの各店の位置とかも記録はされています。
一応MMPoseの中にvisualizerというものがあり、それで可視化しているのはわかるのですが、出力されているjsonをvisualizerに突っ込めるように処理するのもあまり簡単ではなさそうです。
おわり
一方向からの情報でお手軽に解析できる範囲としては十分な結果なのかと思います。複数方向からの情報があったほうが良いのだとは思いますが、複数の視点の情報をどう統合するのかというのもそれはそれで大変な話でしょう。
モデルの中には顔専用のものとかもあるので、三次元情報が必要ない範囲であればいろいろと活用範囲がありそうですね。

コメント